

What Are HuggingFace Transformers, and What Is Ponder?
The HuggingFace Transformers Python library gives users access to hundreds of pre-trained models (BERT from Google, GPT-2 from OpenAI, etc.). In this article, we show how the HuggingFace Transformers library works with Ponder, a tool that uses your data warehouse (Snowflake, BigQuery, DuckDB) as an engine to run your pandas and NumPy code.
Why Ponder?
Ponder improves your productivity without changing your workflows by letting you run pandas directly in your data warehouse or database. This unlocks many benefits:
- You can keep using the same pandas API (which is flexible, concise, and convenient), but with the speed and scale of a data warehouse
- You avoid the costs + limitations that come from pulling data out of a database and into memory (which is what vanilla pandas requires you to do)
It shouldn’t matter whether your data is small, medium, or large: The same pandas data pipelines should run, as is, with your database doing the heavy lifting.
Try Ponder Today
Start running your Python data science workflows in your database within minutes!
It is important to note that in what follows, we do not run transformers functions inside our database — As of now, when we start working with HuggingFace, we pull the data into memory. Our goal here is a humble one: to demonstrate compatibility. You can read more about how Ponder integrates with third-party libraries here.
What follows is adapted directly from Anubhav Goyal’s “Getting started with Hugging Face” Kaggle notebook, which was created as part of the course Data Science: Transformers for Natural Language Processing by Lazy Programmer.
Initializing Ponder and Configuring the Database Connection
After you make a Ponder account and log in with your token (see here to sign up for a free trial), the first steps are to import the libraries you’ll need, initialize Ponder, and configure your database connection:
import duckdb
import ponder
import pandas as pd
import numpy as np
from sklearn.metrics import f1_score, confusion_matrix, roc_auc_score
from transformers import pipeline
ponder.init()
ponder.configure(default_connection=duckdb.connect(), row_transfer_limit=int(1e7))Here, we use the open-source database DuckDB, but you could also use Snowflake or BigQuery (with more database options to come).
Note that since we’ll be pulling data into memory in this case (atypical for Ponder, since for pandas and NumPy it uses the data warehouse as the compute engine), we specify a different row transfer limit than the default of 10K — There are ~15K rows in this example, and we want to work with all of them.
Creating the Classifier, and Loading + Analyzing the Data
Next we create the sentiment classifier, and because we're not specifying the model to use, we get a warning (not shown) that it's defaulting to distilbert-base-uncased-finetuned-sst-2-english.
classifier = pipeline("sentiment-analysis")Next we load the provided dataset of Tweets, which already has a source-of-truth “sentiment” feature that we can later use to evaluate the performance of the sentiment predictions we make based on our model.
Because we’re using pandas with Ponder here, under the hood, this Tweets data is actually being loaded as a table in DuckDB, even though we’re interacting with it using the pandas API.
airline_tweets = pd.read_csv("./Tweets.csv")
airline_tweets.head(2)
tweet_id airline_sentiment airline_sentiment_confidence negativereason negativereason_confidence airline airline_sentiment_gold name negativereason_gold retweet_count text tweet_coord tweet_created tweet_location user_timezone
0 570306133677760513 neutral 1.0000 NaN NaN Virgin America NaN cairdin NaN 0 @VirginAmerica What @dhepburn said. NaN 2015-02-24 11:35:52 -0800 NaN Eastern Time (US & Canada)
1 570301130888122368 positive 0.3486 NaN 0.0 Virgin America NaN jnardino NaN 0 @VirginAmerica plus youve added commercials t... NaN 2015-02-24 11:15:59 -0800 NaN Pacific Time (US & Canada)Before we apply our sentiment classifier to this data, let’s visualize aggregates of the sentiment labels for each Tweet. (We’ll treat these as the source of truth.)
from matplotlib import pyplot as plt
import seaborn as sns

%matplotlib inline
sns.set()
Note that, implicitly, we’re taking a new step when we start plotting — The groupby count portion is getting translated into SQL by Ponder and run in DuckDB, but in the following line, we end up pulling the data into memory to plot it, since Ponder doesn’t push down plotting to the underlying database.
cnt = airline_tweets.groupby('airline_sentiment').count()
sns.barplot(cnt, x=cnt.index, y=cnt["tweet_id"])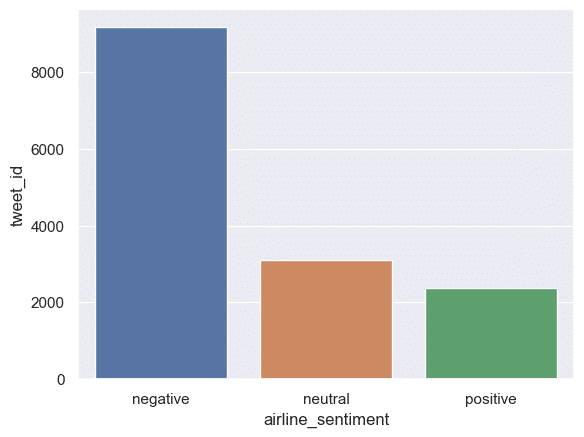
Cleaning the Data, and Applying the Classifier
Since HuggingFace Transformers only have two sentiments options in this classifier (1 and 0), and the Tweets dataset has three (positive, neutral, and negative), we follow the original post and drop all of the rows with Tweets labeled “neutral.” Then we map positive to 1 and negative to 0 so we can compare the source-of-truth results with the results we’re about to get from the classifer.
df = df[df['airline_sentiment'] != "neutral"]
df['target'] = df['airline_sentiment'].map({"positive": 1, 'negative': 0})
Now we apply the sentiment classifer we created earlier to the text of the Tweets, and store the categorical result (‘POSITIVE’ / ‘NEGATIVE’).
texts = list(df['text'])
predictions = classifier(texts)
predictions
[{'label': 'POSITIVE', 'score': 0.6070829629898071},
{'label': 'NEGATIVE', 'score': 0.9973449110984802},
{'label': 'NEGATIVE', 'score': 0.9995823502540588},
{'label': 'NEGATIVE', 'score': 0.9854250550270081},
{'label': 'POSITIVE', 'score': 0.9553212523460388},
{'label': 'POSITIVE', 'score': 0.9827088117599487},
{'label': 'POSITIVE', 'score': 0.9994851350784302},
{'label': 'POSITIVE', 'score': 0.9993509650230408},
{'label': 'POSITIVE', 'score': 0.9940821528434753},
{'label': 'POSITIVE', 'score': 0.9863133430480957}]predictions = pd.DataFrame.from_records(predictions)
preds = predictions["label"] == "POSITIVE"Generating the Confusion Matrix
Now we can generate the confusion matrix, and visualize it, to see how well our classifier did. This will help us see how often our classifier predicted that a Tweet was positive or negative, and how that compares to our source-of-truth sentiment feature for that Tweet.
cm = confusion_matrix(df['target'], preds, normalize = 'true')def plot_confusion_matrix(confusion_matrix, labels):
"""
Plot a confusion matrix using Seaborn.
Args:
confusion_matrix (np.ndarray): The confusion matrix array.
labels (list): List of class labels.
"""
plt.figure(figsize=(8, 6))
sns.set(font_scale=1.4)
# Create the heatmap
sns.heatmap(confusion_matrix, annot=True, fmt = 'g', cmap="Blues",
xticklabels=labels, yticklabels=labels)
plt.title("Confusion Matrix")
plt.xlabel("Predicted")
plt.ylabel("Actual")
plt.show()
plot_confusion_matrix(cm, ['Negative', 'Positive'])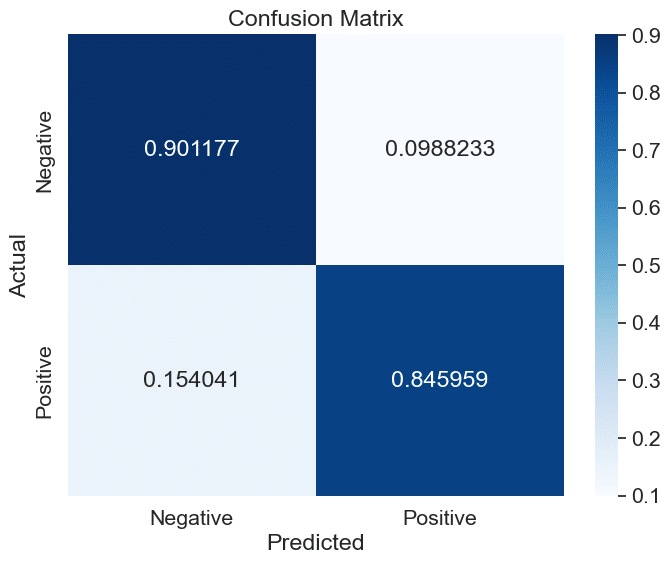
Summary
We replicated the sentiment analysis portion of Anubhav Goyal’s “Getting started with Hugging Face” Kaggle notebook, but instead of using vanilla pandas, we used the pandas API via Ponder. In the process, we demonstrated two things:
- The pandas API via Ponder is compatible with third-party libraries like HuggingFace transformers.
- Unlike vanilla pandas, Ponder performs pandas operations by translating them to SQL and running them on the data in the underlying database. When a third-party library for plotting or machine learning is called, Ponder pulls either a subset or all of the data (depending on user preference) out of the database and into memory.
If you want to try out Ponder for yourself, sign up for a free trial here!
Try Ponder Today
Start running your Python data science workflows in your database within minutes!