

In this article we describe how to use the Snowflake write_pandas function to take a pandas DataFrame and save it as a table in Snowflake.
Note that we’re talking about the write_pandas found in snowflake-connector-python, which gets confusing because there’s also a write_pandas in Snowpark (snowpark-python). More on that in a second.
Learning about write_pandas is valuable even if you intend to use one of the other approaches to saving DFs to Snowflake because those often invoke write_pandas under the hood. For example:
- If you use the pandas DataFrame to_sql method and specify to_sql’s “method” as “pd_writer,” this just calls write_pandas. See here. (Scroll down to the pd_writer documentation.)
- Or if you use the “write_pandas” function found in Snowpark (snowpark-python), this actually imports and uses write_pandas from the snowflake-connector-python. See here.
A Brief History of write_pandas
The Python Connector for Snowflake (snowflake-connector-python) provides a bunch of tools for using Python to work with Snowflake. We covered this in more detail in an earlier article.
The initial public commit of the snowflake-connector-python was made by Shige Takeda in late 2016, but the first write_pandas commit didn’t come until April of 2020.
In order to understand how write_pandas helps, we need to understand what life looked like for people trying to save DataFrames to Snowflake before write_pandas came on the scene.
As far as I can tell, you had a couple of options: You could use to_sql, but as the data consultant Claus Herther noted in a 2019 article, this was slow because it sent the data row by row.
Or you could do what Claus recommended and in Claus’s words:
- Save the contents of the DataFrame to a file
- Upload the file to a location Snowflake can access to load, e.g. a stage in S3
- Create the target table if necessary, or truncate the target table if necessary
- Run a copy command in Snowflake to load the data
This worked, but it was fairly manual and a bit involved. Claus himself called it “quick and dirty.”
The creation of write_pandas meant that with a single command, you could write back your DataFrames efficiently to Snowflake. Fast, and convenient.
How write_pandas Works, and How to Use It
As Shige wrote in his April 2020 commit, write_pandas works by “dumping the DataFrame into Parquet files, uploading them and finally copying their data into the table.”
To do this, you must specify the following parameters:
- The Connection object
- The DataFrame that you want to copy to Snowflake
- The table name you want to copy to
All of the other parameters are optional. There aren’t that many, so we’ll cover them briefly here.
The database and schema parameters come as a pair — If you don’t specify the database, it uses the default one from the Connection object, and if you do specify the database, you also have to specify the schema.
You can specify a bunch of details about how you’d like the data to be passed — If you don’t want it passed over in one chunk, you can specify the chunk_size; if you care about how the data is compressed when converted to Parquet (trading off quality against speed), you can specify the compression type (“gzip,” “snappy”); if you want to upload the Parquet files using a number of threads other than the default of 4, you can set parallel to a different number.
If you want to respond to errors in a particular way (shut down everything and start over, keep going but log the error, etc.), you can specify on_error. (The default is “ABORT_STATEMENT.”)
And this last one might seem a bit strange to people coming at this from the Python world, because we don’t spend that much time thinking about valid column names the way database people do, but you can also specify how you want column names to be handled using quote_identifiers. The default is to use double quotes — so preserving case, and letting you use a wide range of characters. If you set it to false, your columns must “Start with a letter (A-Z, a-z) or an underscore (“_”)” and “Contain only letters, underscores, decimal digits (0-9), and dollar signs (“$”),” and they’ll be stored as uppercase.
Interestingly, if you look at the Github repo, you see a few more possible parameters that don’t appear to be listed in the Snowflake documentation. They have fairly self-explanatory names: auto_create_table, create_temp_table, overwrite, and table_type (with the options “temp,” “transient,” etc.). We’ll use a few of these below, and they’ll turn out to be really important.
A write_pandas Example
First, let’s import everything we’ll need.
import pandas as pd
from snowflake.connector.pandas_tools
import write_pandas
import credential
import snowflake.connector
You don’t strictly need to “import credential,” but I don’t want to share sensitive connection arguments when giving a demo, so I save them in a separate file as credential.py and pull them in by reference when I create the connection. It’s super simple to create the credential.py and __init__.py (which you need to make credential.py importable). You can read more details on how to do this here.
Next, I use the info in credential.py to establish my connection:
snowflake_con = snowflake.connector.connect(
  user=credential.params["user"],
  password=credential.params["password"],
  account=credential.params["account"],
  role=credential.params["role"]
)
Next, we’ll create the sample dataframe we want to save to Snowflake as a table. Let’s pretend we have data on how many gumballs of different colors you consumed this morning. (You have finally accepted that you have a problem, and you’re planning on addressing it any day now.)
gumball_df = pd.DataFrame([('Blue', 2), ('Red', 6), ('Orange', 12), ('Teal', 0)], columns=['color', 'quantity_consumed'])Let’s check out the DataFrame. We don’t have all the info we need to make this statement, but on first glance, you give off anti-teal-gumball vibes.
gumball_df color quantity_consumed
0 Blue 2
1 Red 6
2 Orange 12
3 Teal 0Okay, so this is the moment of truth, and the part that took me the longest to figure out. I’ve used SQL a lot in past data science jobs, but I know much less about creating databases, tables, etc. (what’s called the DDL or “Data Definition Language” part of SQL) than I do about manipulating them using SELECT statements (one portion of the DML or “Data Manipulation Language” part of SQL). This is in part because the places I worked had internal tools to make it easy to create tables using a UI or Python.
So this meant I was surprised when I learned that write_pandas doesn’t let you create the database and schema from within the command — You have to create those in advance, either through the Snowflake browser UI, or through the connection object. This was an extra step I hadn’t anticipated, I suppose because I’m so accustomed to creating DataFrames, and that’s so easy to do.
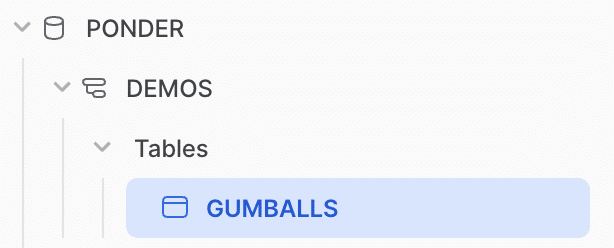
For this example, I decided to use one of my existing databases (“PONDER”), but I created an empty schema using the Snowflake UI. This was very easy — if you click on the database, at the top right corner of the screen you’ll see the following “+ Schema” button:

I unimaginatively called the schema DEMOS (the plural form of “demo,” not the everyday people of ancient Greece).

Even though you can’t create your database and schema from within the write_pandas function, you can create your table using the auto_create_table method (which, again, is strangely absent from the docs).
success, nchunks, nrows, _ = write_pandas(conn=snowflake_con
                                          ,df=gumball_df
                                          ,table_name='GUMBALLS'
                                          ,database='PONDER'
                                          ,schema='DEMOS'
                                          ,auto_create_table=True)
Let’s step through this. The first four variables record pieces of information returned by write_pandas (whether you successfully wrote to the database, etc.).
As for the arguments, we supplied a specific connection, the name of the DataFrame we wanted to save to Snowflake, the name we wanted to give this new table, and where we wanted it saved (the database and schema).
The table now shows up in the Snowflake UI as follows:
If we click on the “Columns” tab, we can see that Snowflake inferred the “color” column as a Varchar and the “quantity_consumed” column as a Number.

And if we click on the “Data Preview” tab, we see what used to be our little pandas DataFrame all grown up as a Snowflake table!
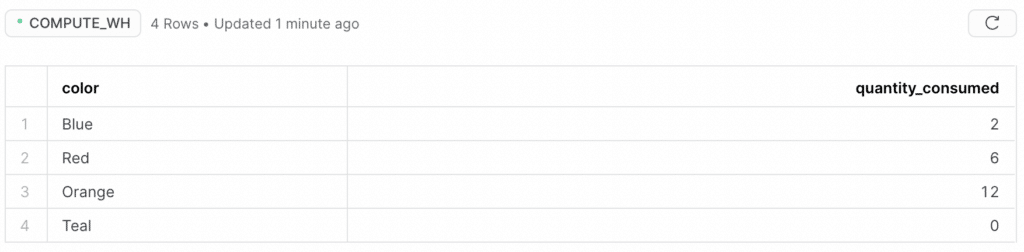
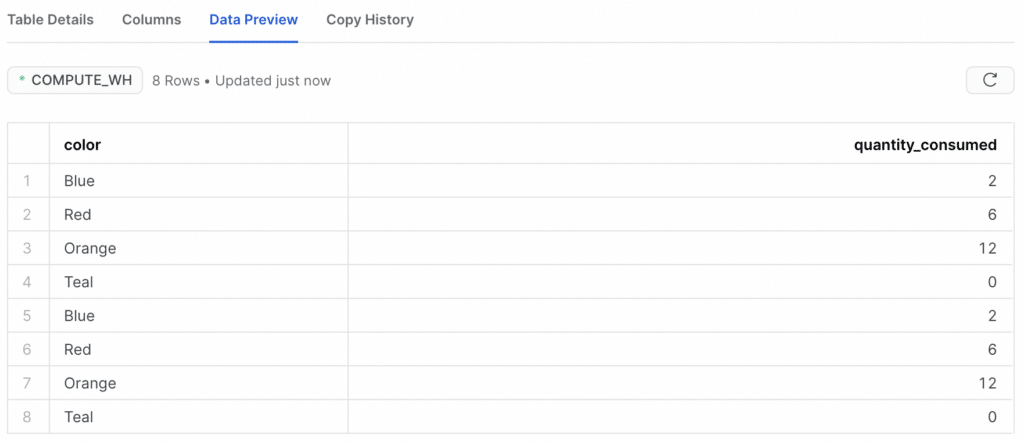
If we run write_pandas again, it appends our data a second time!
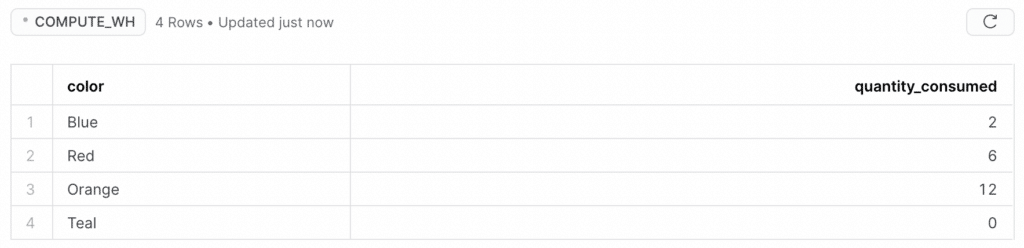
If we wanted to overwrite the table, and not merely append data to it, we should specify that by setting the overwrite parameter equal to True, like this:
success, nchunks, nrows, _ = write_pandas(conn=snowflake_con
                                          ,df=gumball_df
                                          ,table_name='GUMBALLS'
                                          ,database='PONDER'
                                          ,schema='DEMOS'
                                          ,auto_create_table=True
                                          ,overwrite=True)
When we run this, we get only the four rows (because we’ve overwritten the eight rows that were there):
Writing a DataFrame to Snowflake with Ponder
Often, people use write_pandas as part of a workflow where they’re pulling data out of Snowflake as a pandas DataFrame, manipulating it, and pushing it back into Snowflake. Our tool at Ponder lets you code in pandas and keep the data in your database the whole time by translating your pandas code to SQL.
So you get to use the pandas API and run your data pipelines on a data warehouse, one of the most battle-tested and heavily-optimized data infrastructures. And you don’t need to spend time pulling data into memory as a pandas DataFrame and pushing it back into Snowflake.
If you do have a pandas DataFrame you’d like to push to Snowflake, like our gumball one (we’ll call it gumball_df), all you have to do with Ponder is log in with your Ponder token (not shown), connect to Snowflake, initialize and configure Ponder, and then use to_sql. This will create the table automatically:
import modin.pandas as pd
import snowflake.connector
import credential
import ponder
snowflake_con = snowflake.connector.connect(
user=credential.params["user"],
password=credential.params["password"],
account=credential.params["account"],
role=credential.params["role"],
database="PONDER",
schema="DEMOS",
warehouse="PONDER_WH"
)
ponder.init()
ponder.configure(default_connection=snowflake_con)
df = pd.DataFrame(gumball_df)
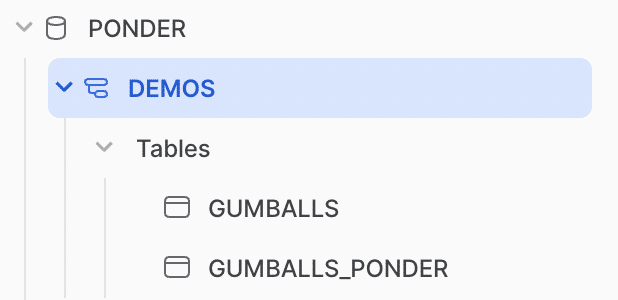
df.to_sql(name="GUMBALLS_PONDER",con=snowflake_con)Here’s what you’d see in the Snowflake UI Databases menu:
And here’s what you’d see in the “Data Preview” tab for GUMBALLS_PONDER:

Conclusion
In this article, we briefly introduced Snowflake write_pandas; we discussed its history and what life was like in the dark ages before it existed; we described the different parameters it accepts and how to use it; we ran through an example to show it in action; and we introduced Ponder.
Give write_pandas a shot! And if you want to use pandas to interact with data in your database and not have to pull the data into memory at all, Try Ponder Today!
Try Ponder Today
Start running your Python data science workflows in your database within minutes!